Si usas Plank, lo mismo quieres personalizarlo un poco. Para ello puedes instalar una gran variedad de temas existentes, como los de estos enlaces:
Para instalarlos, sólo tienes que copiarlos en la ruta:
/home/TU_USUARIO/.local/share/plank/themes
Para seleccionar el tema y configurar más aspectos de Plank, abre una terminal y escribe:
plank --preferences
Se abrirá algo así:
No obstante, a pesar de todas las opciones, puede que lo único que desees sea cambiar el color del fondo del dock para que coincida con el mismo del decorador de ventanas que estes usando, por ejemplo.
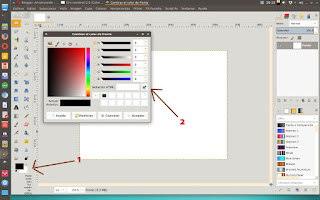
Para ello vamos a abrir una herramienta que nos permita seleccionar el código de color, por ejemplo Gimp:
Una vez seleccionado el color, nos aparecerá un código parecido a esto: 4e4844
Ese es el código hexadecimal.
Después tendremos que transformar el código obtenido a código en formato RGB. Para ello nos vamos a la página: RapidTables
Pegamos el código y nos dará el nuevo código pero en formato RGB:
En el caso del ejemplo, hemos transformado el código hexadecimal 4e4844 a código RGB 78 72 68
Ahora nos vamos a:
/home/TU_USUARIO/.local/share/plank/themes
Allí seleccionamos el tema que queramos cambiar y editamos con gedit, mousepad, kate o con cualquier editor de texto plano el archivo:
dock.theme
Miramos el contenido del mismo, os pongo el tema de ejemplo NUMIX, que lo voy a cambiar al color de POP GTK (lo podéis descargar de este enlace). Incluso le puedes cambiar el nombre y copiarlo dentro de otra subcarpeta dentro de /plank/themes , así conservaremos los dos temas.
Contenido del archivo dock.theme:
--------------------------------------------------------------------------------------------------------------------
#This file auto-generated by Plank.
#2017-11-09T22:22:50+0000
[PlankTheme]
#The roundness of the top corners.
TopRoundness=2
#The roundness of the bottom corners.
BottomRoundness=0
#The thickness (in pixels) of lines drawn.
LineWidth=1
#The color (RGBA) of the outer stroke.
OuterStrokeColor=
72;;
72;;
72;;255
#The starting color (RGBA) of the fill gradient.
FillStartColor=
45;;
45;;
45;;255
#The ending color (RGBA) of the fill gradient.
FillEndColor=
45;;
45;;
45;;255
#The color (RGBA) of the inner stroke.
InnerStrokeColor=
45;;
45;;
45;;255
[PlankDockTheme]
#The padding on the left/right dock edges, in tenths of a percent of IconSize.
HorizPadding=0
#The padding on the top dock edge, in tenths of a percent of IconSize.
TopPadding=1.5
#The padding on the bottom dock edge, in tenths of a percent of IconSize.
BottomPadding=1.5
#The padding between items on the dock, in tenths of a percent of IconSize.
ItemPadding=5
#The size of item indicators, in tenths of a percent of IconSize.
IndicatorSize=5
#The size of the icon-shadow behind every item, in tenths of a percent of IconSize.
IconShadowSize=0
#The height (in percent of IconSize) to bounce an icon when the application sets urgent.
UrgentBounceHeight=1.6666666666666667
#The height (in percent of IconSize) to bounce an icon when launching an application.
LaunchBounceHeight=1
#The opacity value (0 to 1) to fade the dock to when hiding it.
FadeOpacity=1
#The amount of time (in ms) for click animations.
ClickTime=300
#The amount of time (in ms) to bounce an urgent icon.
UrgentBounceTime=600
#The amount of time (in ms) to bounce an icon when launching an application.
LaunchBounceTime=600
#The amount of time (in ms) for active window indicator animations.
ActiveTime=300
#The amount of time (in ms) to slide icons into/out of the dock.
SlideTime=300
#The time (in ms) to fade the dock in/out on a hide (if FadeOpacity is < 1).
FadeTime=250
#The time (in ms) to slide the dock in/out on a hide (if FadeOpacity is 1).
HideTime=150
#The size of the urgent glow (shown when dock is hidden), in tenths of a percent of IconSize.
GlowSize=30
#The total time (in ms) to show the hidden-dock urgent glow.
GlowTime=10000
#The time (in ms) of each pulse of the hidden-dock urgent glow.
GlowPulseTime=2000
#The hue-shift (-180 to 180) of the urgent indicator color.
UrgentHueShift=150
#The time (in ms) to move an item to its new position or its addition/removal to/from the dock.
ItemMoveTime=450
#Whether background and icons will unhide/hide with different speeds. The top-border of both will leave/hit the screen-edge at the same time.
CascadeHide=true
--------------------------------------------------------------------------------------------------------------------
Los números que os he puesto en negrita son los que hay que cambiar por los tres números que tiene el nuevo código obtenido... El número 255 se refiere a la opacidad del color, lo podéis dejar igual:
--------------------------------------------------------------------------------------------------------------------
.
.
.
#The color (RGBA) of the outer stroke.
OuterStrokeColor=
78;;72;;68;;255
#The starting color (RGBA) of the fill gradient.
FillStartColor=
78;;72;;68;;255
#The ending color (RGBA) of the fill gradient.
FillEndColor=
78;;72;;68;;255
#The color (RGBA) of the inner stroke.
InnerStrokeColor=
78;;72;;68;;255
.
.
.
--------------------------------------------------------------------------------------------------------------------
Así, al aplicar el nuevo tema, obtendréis un dock con el color que queráis.
¡Fácil, verdad!


